Looking after your awning
Caring for your awning canvas
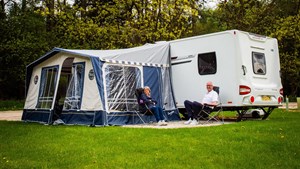 If you have invested time and money in finding an awning for your caravan or motorhome you'll want it to last. This guide gives some pointers to help make sure it provides the best accommodation for as long as possible, assuming you're prepared to put in a little time and effort.
If you look after your awning it should provide you with many years of holiday memories - and you can start at the campsite. Before unpacking your awning, check the ground for stones, old pegs or anything else that might damage it or the groundsheet (if you're using one).
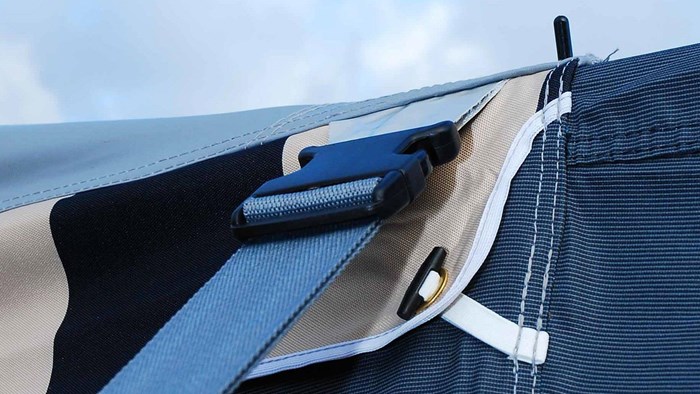
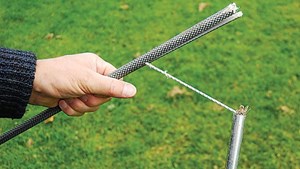
Use storm straps for stability but don’t make them too tight.
When you pitch, position the guy lines and any storm straps carefully so the fabric doesn't flap, which can cause excessive wear, but don't have it so tight it's under stress. Different fabrics react in different ways to the rain and temperature changes so it's worth checking the tension in the guy lines occasionally throughout your stay. Also, check the pegs are pointing in a direction that won't allow the guy lines to slip off or the pegs to pull out of the ground.
Repair kits
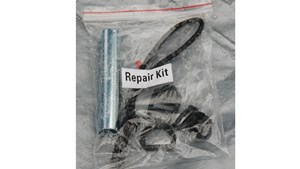 Some awnings come with a small repair kit that includes a short section of pole, a spare guy line, patches of fabric and adhesive. If yours doesn't have this, it's worth putting together a similar pack. You may like to add some plastic cable ties and a roll of gaffer tape along with a few extra pegs. Add a decent mallet and peg puller and a kit like this should allow you to fix most problems while you're out on the campsite. If you need to solve a problem temporarily in the field, don't forget to make a more permanent repair when you get home - the chances are you'll forget about it if you wait until your next trip.
Cleaning and reproofing your awnings
It's normally easiest to clean and reproof your awning when it's pitched. This way you can work methodically around the whole unit and be sure you've cleaned and treated it all. Please don't put your pride and joy into the washing machine - neither the machine nor the awning will fare well.
Brush off any loose dirt and if necessary scrape it off gently with a flat-bladed knife or a piece of plastic - old store or credit cards can be good for this Use a cleaning liquid to clean the fabric, taking care to match the type of fluid to your awning fabric and follow the instructions carefully If necessary use a highly diluted bleach to tackle mould and mildew stains. Sterilising liquid, such as that used for baby bottles, is good for this. It may not remove the black staining (bleach in concentrations strong enough to do this could permanently damage the fabric) but it should kill the organisms that create the marks and prevent the musty smell they produce Rinse thoroughly with clean water to remove all traces of the cleaning fluid Allow to dry naturally Waterproof the fabric using a reproofing liquid, again appropriate to your awning, following the instructions carefully Allow to dry naturally
Packing away
 Here's a checklist to make sure your awning has the best chance of being in perfect condition when you next need it:
- Check the fabric (the main fabric along with any inner tents, groundsheet, mudwalls, skirts and wheel covers) to make sure it's clean and dry then clean, repair and reproof if necessary.
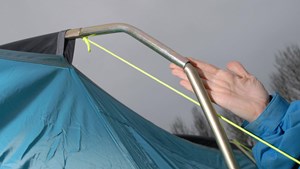
- Inspect the poles, cleaning and repairing them as required. Check the ends, any connecting cords, spring links and other attachments to make sure they are not damaged. If you need to re-thread an elastic cord, a Bulldog clip can be useful to secure the cord to stop it springing back. Store the poles in a separate bag to prevent them damaging the fabric of your awning.
 Clean and count the pegs. If you need to straighten any you can try holding them in a vice and tapping them with a hammer (metal pegs only). If any are missing, consider replacing them with some different types of pegs to suit different ground conditions. Store the pegs in a separate bag to prevent them damaging the fabric of your awning.
 - Check the connecting points around the awning, including pegging points and guy lines.
- Make sure the pads or suckers that protect the side of your caravan or motorhome are in good condition and replace them if they are not.
- Look over all the seams and reseal if necessary.
 Inspect any windows, vents, flyscreens and other items for damage.
 - Try the zips. Use a lubricant (a proprietary spray or candle wax) on any that don't run freely.
- Avoid folding the awning the same way every time to prevent wear along the folds.
- Store your awning in a cool dry place out of direct sunlight. Don't keep it in a plastic bag or you may have a problem with condensation.
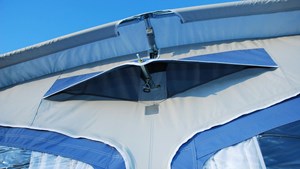
Rigid poles
Your awning is probably most vulnerable when you are pitching it and taking it down again. Poles, for example, can bend, fracture or break if they are over stressed when you thread them into their sleeves. If they are really sticking try using a little silicone furniture polish. Avoid oil or grease as it can damage the fabric.
Always push a pole into its sleeve carefully so you don't tear the fabric. Avoid pulling sectional poles as the parts will often separate and can catch easily.
If a pole breaks, gaffer tape or the more traditional lashing with string (search for 'lashings' on scoutbase.org.uk for more information) can provide a temporary repair in the field, but it's worth buying a new section or complete pole as soon as possible. Outdoor retailers generally carry a selection of poles that can be cut to size to replace a broken part or the dealer who sold you the awning should be able to help. Ideally take the broken pole with you to the store to find a good match. If this isn't practical, make a note of the material it's made of (GRP, aluminium alloy or steel), its diameter and the length you need before you visit.
Alternatively you can contact a specialist spares company to see whether it stocks poles for your awning model.
Inflatable Poles
Inflatable frames are generally maintenance free and easy to setup. The one thing you may experience is a puncture in one of these tubes. For some types where tubes can be isolated it is a minor inconvenience and may be able to be left for repair when you get home. For the type where the tubes are either interlinked or form large sections it may mean the awning can no longer be used until a repair has been performed.
The puncture may be from a sharp object piercing the protective sleeves and air bladder or more likely due to overinflation. Always use the approved pump to inflate to the specified pressure. You may need to drop the pressure if the ambient temperature rises, for example when pitching in the evening and the following day is particularly hot. Most air awnings are more reliant on volume to support the fabric so reducing the pressure a bit should not cause any major issue. This is particularly relevant for those travelling to warmer European destinations. Its worth noting some makes of inflatable awnings have built-in pressure relief which should avoid this situation, check your instructions.
Repair may be possible in most cases, but never remove the tube from its sleeve until it is completely deflated as it will likely burst. Use products recommended by the awning maker, they may have a repair kit available or have some Tear Aid or Storm Sure to hand. For a temporary repair gaffer tape may slow a leak down to a manageable level until it can be repaired or replaced. In some rare situations the whole tube may need replacing.
When reinstalling a bladder and to avoid the zip pinching it when zipping into the protective sleeve, put your fingers under the slider as you pull the zip up. Resecure the end of the zip to avoid accidently opening.
Ideally fold the awning in different ways to avoid repeatedly fatiguing the air poles in the same position. Work any trapped air out of the outlet/s while folding the awning can help while putting it back in the bag also.
Beware the bubble!
Don't let children blow bubbles too close to your awning. The detergent in the liquid can affect the proofing, as can any soap, oil or grease.
Fabric
The fabric of your awning can be damaged by many things, from the acid of bird droppings to the ultraviolet light of the sun, mildew in storage to a tear from a misplaced pole. If the fabric tears you can patch it simply by using a suitable adhesive to stick on a piece of matching fabric. For a more permanent repair, stitch the patch in place but remember to seal the stitching holes with an appropriate sealant. There are companies that provide a repair service but since awnings are generally quite heavy to send in the post, it's worth asking at your local camping store or searching online to find a local repairer to avoid transport costs.
Keeping dry
In certain weather conditions you're likely to find droplets of condensation inside your awning, even if you've taken every precaution to make it waterproof. This is especially true in nylon or polyester units and it is one reason these generally have breathable inner tents if you're using the awning for sleeping. If the water collects on the outer fabric however, it shouldn't drip directly on you at night.
You can minimise condensation by keeping a good airflow through your awning. Keep the vent panels open and make sure you don't accidentally block any low-level panels with items such as sleeping bags or storage packs.
Looking after the awning rail
Check the awning channel of your caravan or motorhome before you refit an awning. Sharp projections can tear fabric and knocks can close up the channel so it is difficult to thread the fabric. If you need to open up the channel, use a shaped piece of wood (or a proprietary awning rail spreader) for minor pinch-points. Seek professional guidance for more severe damage. A squirt of silicone-based lubricant or furniture polish along the awning channel can help if the fabric does not slide through easily.
Mildew
Mildew or mould is bad news for an awning. It is caused by fungi that will at best discolour your awning and give it a musty smell, and at worst consume the fabric until it disintegrates.
Prevention is definitely better than cure, so make sure your awning is clean and dry before you store it and try to keep it in a place that has reasonable air circulation where the surrounding air isn't humid. Chances are this won't be in your caravan or motorhome.
If you're unlucky enough to find mildew or mould anyway, prevent it from spreading by rinsing with water and white vinegar or a mild sterilising fluid such as that used for baby bottles. Leave for about half an hour and then rinse the area thoroughly. You'll probably need to reproof the fabric afterwards.
Seams and zips
If you find the zips on your awning are getting a little difficult to open and close, you can buy a lubrication spray to get them moving again. Rubbing the wax of a candle into the zip should have the same effect. This is definitely worth doing before that first zip breaks.
Likewise, if the seams show any signs of letting in water you can seal them using a proprietary seam sealant. Make sure the sealant is completely dry before packing your awning away - to avoid the wrong bits of fabric sticking together.
What about waterproofing?
On awnings made from man-made fabrics such as nylon, polyester and coated polycotton, water should form droplets on the surface of the material and then roll off. This waterproofing is normally achieved using a coating known as a durable water repellent (DWR). The DWR can become less effective over time for a number of reasons. For example, it can degrade in sunlight or be damaged if the fabric rubs against a rough surface. If the coating fails, water will start to soak into the fabric (darkening it) and it's time to consider reproofing your awning.
Weathering
It used to be standard practice to weather canvas before using it. A new 100 per cent cotton canvas awning will often leak when it first gets wet so it's preferable to soak it in a controlled environment first. The process of thoroughly wetting the fabric, known as weathering, allows the fibres to swell and fill any gaps in the weave. You can do this by pitching the awning and leaving it out in the rain for a while or by spraying it with water from a hosepipe or watering can.
When the canvas dries the fibres remain closed and the next time it rains you should stay dry inside. Natural fibres tend to react differently to man-made materials when they are wet so it's generally best to use natural guy lines (such as hemp) on cotton awnings and man-made guy lines on polyester, nylon and similar.